

This hook case is simple, fast, and customizable. Because you don't sew pockets, it can change with your hook collection.
Supplies: Less than 1 skein medium weight yarn
Size 5mm hook (H/8) (Or whatever size is appropriate for the yarn you are using)
Abbreviations: ch – chain, hdc – half double crochet, YO – yarn over
Pattern:
Ch 64
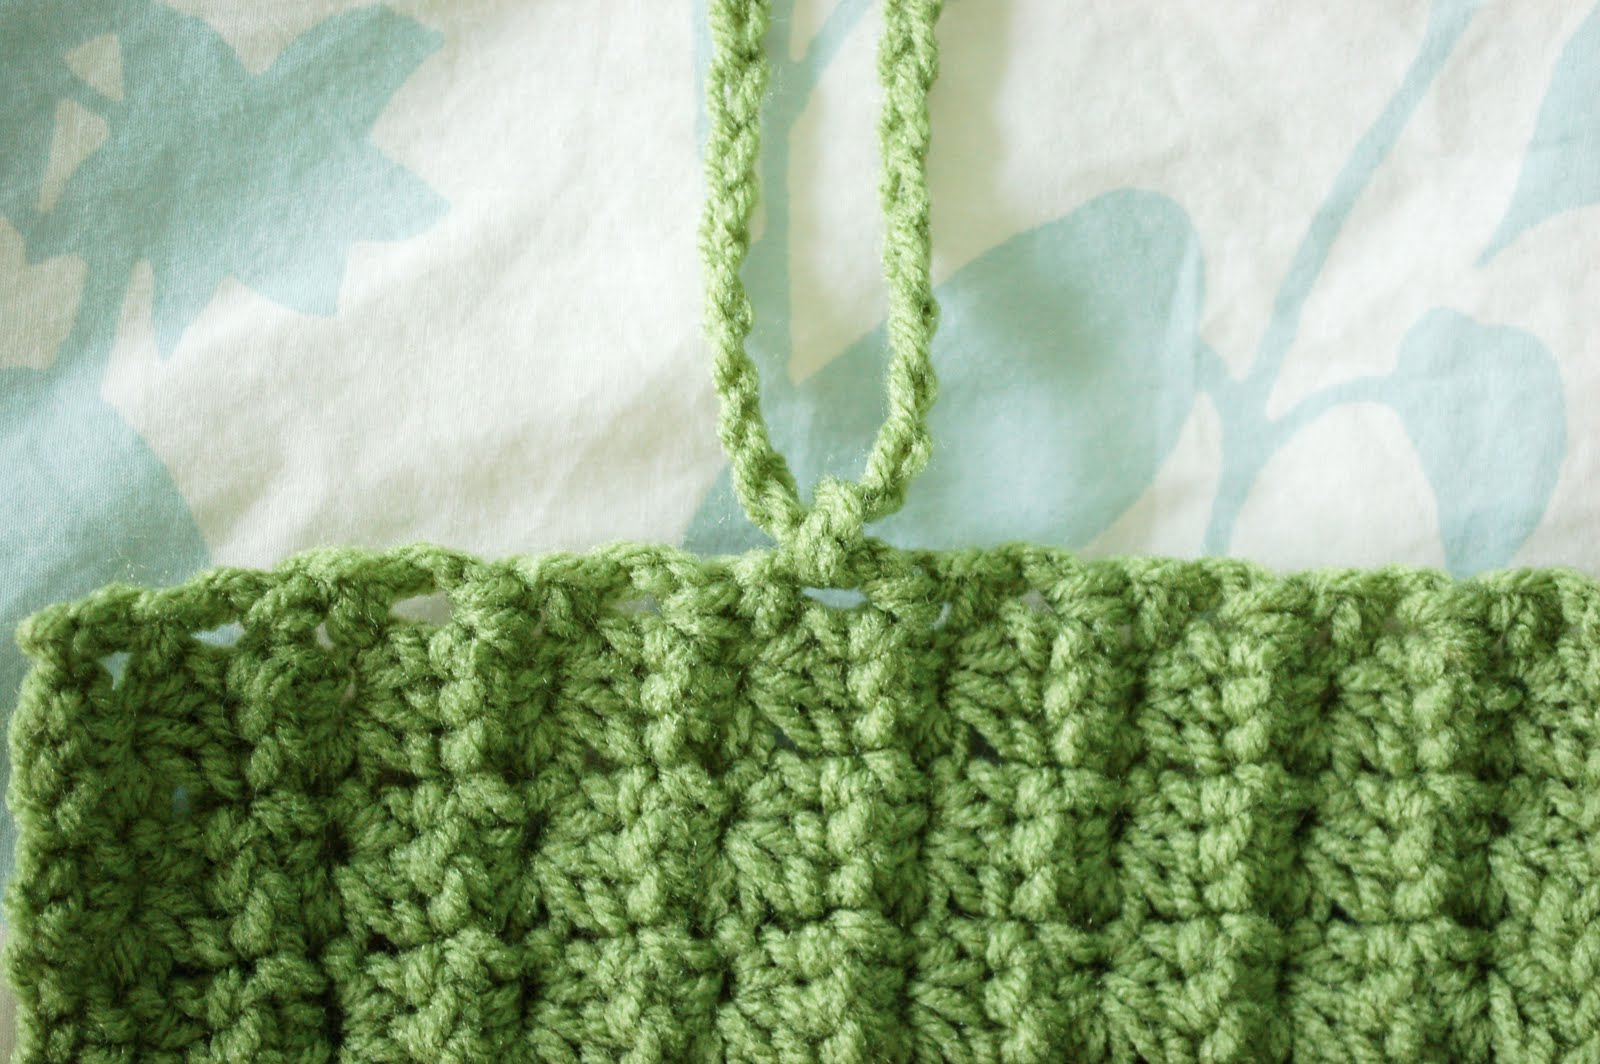
Row 1: Pull up a loop in the second ch from hook and in the following four chs, for a total of 6 loops on the hook. YO, pull through all 6 loops on hook, ch 1 to close the star. *Pull up a loop in the center of the star just created, pull up a loop in the last ch used in the previous star, pull up a loop in the next 3 chs, for a total of 6 loops on the hook. YO, pull through all 6 loops on hook, ch 1 to close the star.* Repeat from * accross. Hdc in last ch. Ch 2, turn.
Row 2: Three hdc in center of each star across (60 hdc). Hdc in ch 2 space, ch 2, turn.
Row 3: Pull up a loop in the second ch from hook and in the next 4 hdcs, for a total of 6 loops on the hook. YO, pull through all 6 loops on hook. *Pull up a loop in the center of the star just created, pull up a loop in the last hdc used in the previous star, pull up a loop in the next 3 hdcs, for a total of 6 loops on the hook. YO, pull through all 6 loops on hook, ch 1 to close the star.* Repeat from * across. Hdc in last Hdc. Ch 2, turn.
Row 4-15: Repeat Rows 2 and 3.
Row 16: Three hdc in center of each star across (60 hdc). Hdc in ch 2 space, finish off. Weave in ends.
Tie: Ch 75. Finish off, weave in ends. Tie around ch 2 space between rows 8 and 9.
You may want to block this overnight. It tends to take on a trapezoidal shape. I didn't block mine, but since it stays rolled up straight most of the time, it doesn't look off anymore.
To use—slide hooks in star holes, slide needles in ribs on “wrong side.” To store, roll up with wrong side in, tie.


Special thanks to the star stitch tutorial: How to Crochet: The Star Stitch on The Crochet Spot blog.
©2010 Alli Hyer, all rights reserved. You may sell items you make with this crochet pattern, but if you sell them online, you must link to this crochet pattern. You may not sell this crochet pattern or claim it as your own. You may publish or post a link to this crochet pattern, but you may not publish or post this crochet pattern in whole or in part.
Thank you for the cute idea. I have been crocheting for only a few months and can't wait to see what else you come up with!!!
ReplyDeleteLovely case. Great color!
ReplyDeleteso pretty! thanks for sharing this lovely and useful pattern. it's the nicest one i've come across. :)
ReplyDeleteVery unique & practical! I have needed & tried to create something like this because I travel aa lot & this is perfect for my hooks & other crocheting needs. Thanx so much for sharing!
ReplyDeleteHow fun! Saw your pattern this morning and had to try it. My crochet hooks are now in their new holder. Thanks so much for sharing!
ReplyDeleteHi. I LOVE this, and want so badly to make it, but I'm having such a hard time. I feel so stupid! I'm on my 3rd try now and I just don't know what I'm doing wrong. I'm getting a row that looks like a chain in-between each row of stars :( Any idea what I could be doing wrong?
ReplyDeleteHeidi, I'm not really sure what you're doing, but did you check out the tutorial I linked to at the end of the post? That might help - it has step-by-step pictures of how to make the stars.
ReplyDeleteThank you for your response Alli. It was something really stupid, actually several things. Too embarrassed to repeat! Got it figured out now though. Thank you so much for such a cute project!
ReplyDeleteI'm anxious to make this for my hooks - a cute way to keep them organized.
ReplyDeleteNow that would be really handy when one is travelling on train to Sydney next wk..Cuts down on the clutter in crochet bag to carry..Great idea..Thanks heaps.. Hahnsmum, New England, NSW, Australia..
ReplyDeleteWell now that will come in handy! I have a bag that has a spot for my hooks, but they are all bunched together and just roll around. Nothing like having to dig and dig and dig!
ReplyDeleteThank you !
I like this Alli! I have not made one of these yet, so thanks for sharing your pattern! ~tina
ReplyDeleteVery simple, nice and easy. Thank you for sharing
ReplyDeleteIm making it as we speak!!!! Very Excited.... A blue mint color! So far its gorgeous!!!!! I used a very soft acrylic yarn.... cant wait to do it!!!!
ReplyDeleteOh Alli! This is a beautiful hook holder!!! I cannot wait to get started making these for gifts. Thank you so much for sharing your talent!
ReplyDeleteIt took me half an hour to make it, I really like it. Thanks
ReplyDeleteI found that in row three it works much better to do 2 hdc in each star. 3 hdc made it misshapen.
ReplyDeleteThis is absolutely fantastic and so creative! I have been knitting & crocheting for 45 yrs or so, and my plastic zippered crochet hook case is slowly drying up with old age! I will definietly make this because my hooks have been so faithful to me that I should give them a beautiful new home! Thanks you so much for designing it & sharing!
ReplyDeleteLove this! I would like to link this pattern to my blog. Is that OK?
ReplyDeleteSisterSue, that's fine!
ReplyDeleteHi Alli!
ReplyDeleteI LOVE this pattern! It's cute and works great!
Thanks for sharing! (Is it ok to post a link to it on my blog?
Melissa
Sure, Melissa!
ReplyDeleteThank you,Alli! This is exactly what I need, exactly when I needed it! I bought my BFF a new set of crochet hooks for her birthday and haven't found a pattern for a case that I honestly liked. This is perfect! Guess what "ll be crocheting today?
ReplyDeleteBlessings,
Leslie
So I've opted for an F hook, to make a tighter more rigid case. That being said:
ReplyDelete#1) I need to add length to the initial chain as a result, but am not sure what the multiple is for the actual "star". How many more chains will make one more added "star"?
#2) If you were to use alternating colors on these "stars", would you change colors each instance of Row 2+3?
And ONE more question:
#3) When you made it from this pattern, what was the width of the initial chain (and will it turn out to be the length or the width of the finished product?)?
Thanks so much for your help! I love all of your adorable baby hats and other patterns! Your wee one(s) must be quite snappily dressed :).
Thank you for sharing this pattern. I just finished mine. I am on Ravelry, named totocorde.
ReplyDeleteAlso I posted about this project done by me on my blog with the information of your blog. I hope you don't mind it. If yes, please let me know it. I will delete the detailed info immediately.
Anyway, I love this pattern and am satisfied with my result. Thank you again!!!
Love this one! Linking up at Tangled Happy next Tuesday. :)
ReplyDeleteThanks, this is great. I'm going to be pinning this :)
ReplyDeleteFácil y práctico. Gracias por la idea. Besos
ReplyDeleteI'm not sure what I did wrong, but somehow I ended up with a decreasing number of stars in each row....ripped it out and am trying again. Sigh. Also, your pattern says to ch64, but the tutorial says to do an odd number. Am contemplating making the leap to 65. :)
ReplyDeletep.s.- never mind...I just can't read. Or count. I've got it now!
ReplyDeleteAll I was looking for! Thank you!
ReplyDeleteThanks for sharing - love that you aren't locked into the needle size. Can't wait to get started on this!
ReplyDeleteThank you for posting this! I'm so glad I found it on allfreecrochet.com because I need one of these as my hooks are currently in a zip baggie.
ReplyDeletei made one of these and i love it :) it hold all of my hooks which is great because i take my crochet to school and work on my projects so im always on the move
ReplyDeleteLove this idea!!! Shall have to make one after I finish some other projects.
ReplyDeleteThanks!!
Elise
I got all of my Grandma's crochet hooks when she passed away a couple of months ago. It will be nice to give them a beautiful new home. Thank you.
ReplyDeleteJust finished mine in purple. It's so cute and clever. My husband thought it was a neat idea, too! The star stitch was fun to do. Many thanks for sharing. :)
ReplyDeleteHave to make one for my daughter that finally decided to start learning to crochet!
ReplyDeleteThank you, this is so cute!
I have a new crochet club at my school (I am principal at an International School in Saudi Arabia). I have some people I would like to make these for, but I was also wondering if it would be too difficult for beginners to make?
ReplyDeleteMy puppy (9 month old puggle) just chewed up my crochet hook case last week. I sat down and made one of these for my Sunday afternoon project. Turned out great! Thanks so much for the pattern. :)
ReplyDeleteThat is a great idea!
ReplyDeleteWanted you to know that I pinned your project and I included a link back to your blog..
ReplyDeletehttp://pinterest.com/pin/208432288974366731/
Hopefully going to try this as soon as I finish a dishcloth with a half double crochet that's kicking my butt. I'll post the pic on my blog
In row 3 after you pull through the first set of 6 loops, are you supposed to chain 1 to close off the star and just forgot to put that in the pattern? Or do you not chain 1?
ReplyDeleteIm just curious, spent all day trying to make slippers that did NOT turn out at ALL well. And i REALLY LOVE this ase so i just wanna get it right lol
Anon,
ReplyDeleteCheck out the star stitch tutorial listed at the bottom of the post. There are more visuals there that might help. All the best!
Alli
Hi! I just finished the crochet case for myself, and I love it. I'm pretty new to crochet and I found it an easy pattern, and one of the first projects I've completed. I used several different colors so I could practice changing yarns. My hubby has requested I make him one for his paintbrushes, so that's my next project. Thanks for the free pattern.
ReplyDeleteAlli I loved this. It was so simple and beautiful. I did mine in a bright yellow. I also want to tell you that I added a small pocket in the bottom right corner of mine with a button closure so I can keep my stitch markers close by too. I love mine so much!
ReplyDeleteThank you so much for this pattern. I found it on Pinterest tonight and I just had to make it! It turned out beautifully! I see a few crocheting friends of mine receiving these as gifts for Christmas! Thanks again!
ReplyDeletestunning article themed http://casinogamesonlinee.blogspot.com best online casino
ReplyDeleteThanks so much! Just finished and organized my hooks! I live it!!
ReplyDeleteThanks so much for posting this! When I first learned to crochet this summer, I had no idea how much I would grow to love it...or how quickly my hook and needle collection would grow! I have a small case I made as one of my first projects, but am in desperate need of another, and want to leave room for further expansion, and this was the perfect solution!
ReplyDeleteAli,
ReplyDeleteI made this case for myself awhile back and LOVE it! I also wanted to say that I am constantly coming back to your blog... Everything you make is so BEAUTIFUL! And the patterns are very easy to understand! Thank you time and time again!
Sincerely,
Petra
Love this pattern, and stitch! I dyed some cotton with kool-aid a few weeks ago, and now it will become your hook case :) Curious to know if your row 2 is supposed to be different at the end then the linked tutorial. Yours says to chain 2, but the tutorial says to chain 3. Now that I'm at the end of row 3 I am one hdc short. Thoughts?
ReplyDeleteI love your crochet hook case! I just post about it in my blog:
ReplyDeletehttp://tremenducrochet.wordpress.com/2013/01/25/tremendu-hook-case/
Thanks for sharing and congratulations for your good work!
IN THE DIRECTIONS FOR ROW 2, SHOULD THE LAST STITCH IN ROW " Hdc in ch 2 space" BE HDC IN LAST CHAIN INSTEAD OF CH 2 SPACE?
ReplyDeleteAND BEFORE THE * ON ROW 3 SHOULD THERE BE A CH 1?
"Row 3: Pull up a loop .... YO, pull through all 6 loops on hook. *Pull up a loop in the center of the star just created....
I want to make this so badly! The star stitch is my new puff stitch in that no matter how hard I try, I can't get it right. The tutorial was helpful but I still can't get it. I did finally get the puff stitch after countless tries so maybe someday I'll be able to make this pattern but not today. :(
ReplyDeleteThanks for the pattern! you can find my hook case at http://arrosambmango.blogspot.com.es/2013/03/im-back.html
ReplyDeleteHi Alli, thank you for this great pattern! I was wondering, did you put your hook through both loops of a stitch, or just front/back loop? Thanks. :)
ReplyDeleteThanks for this!! It's great! I do have one request though. If i wanted to make it even longer, how many stitches do i keep adding on? x6? Also, i have this huge crochet hook that's like, the bottom as as big as a dime, and i don't think it'll fit through those holes.
ReplyDeleteAny advice is appreciated!!
Not actually sure on the number of stitches to add... maybe it says in the star stitch tutorial link?
DeleteAs far as the big hook - if you crochet with a bit of give in the stitch, it should stretch as far as you need. It might be tight the first few times, but the yarn will shift so that the hook will fit.
Thank you Alli!
ReplyDeleteI only learned to crochet a matter of weeks ago, and all I'd done so far were granny squares. I followed this pattern so easily, and made it in a matter of hours (not bad for a newbie!) So pretty and easy to understand, brilliant!
Thank you Alli. Not only for the very clever, easy treatment of a crochet hook holder but....... I have been trying to master the star stich since 1980. Your pattern instructions are so very clear, I mastered it within two rows. Another drop in my bucket list.
ReplyDeleteHas anyone had luck with the "blocking" helping the shape? Mine is curving a lot.
ReplyDeleteThank you Alli For this pattern. I have completed it and am excited to give it away for a Christmas present. I followed your directions, your tutorial and Two different people on utube Demonstrating the star Pattern. It looks like it could be blocked but it's always going to be tied up so I don't think it matters. I am not going to block it
ReplyDeleteI've been searching for a case that I loved and that I could use with fatter handled crochet hooks.. I think I just found it. Thanks for sharing!
ReplyDeleteMade one for hooks first then makeup brushes now one for paint brushes
ReplyDeleteHey, I wanted to thank you so much for the tutorial. As an über beginner (like, I'm set on finishing this project, after trying gloves and finding those a little hard for a self-taught nooblet), this is going to be my first finished piece. I'm having fun with it, and love how yours looks... mine's a little on the shoddy side, but hey, at least I can see the stars!
ReplyDeleteI appreciate the work that must have went into this, and thank you for the great idea and simple to follow instructions! It'll be great practice for me, as well as a trial and error.
Once again, thank you!
-Brittany
I just love this pattern - thanks so much! What a great way to learn a new stitch (although I had to look up a video to help me catch on), and I love how puffy it is. Mine definitely is coming up trapezoidal so hopefully blocking it will fix that issue... I tend to have trouble with the ends of rows anyway so I'm sure I'm making it worse. :) I'm using Caron Simply Soft in Victorian pink. Love love love!
ReplyDeleteNow that I think about it, it's coming up a parallelogram rather than a trapezoid, haha.
DeleteI had several rows of this pattern done already tonight when I noticed the stars were not lining up. So when inserting a hook through the stars, it would be sitting at a slight angle. I ripped the entire thing out and tried a different case which also is not working for me. I think I've been spoiled by this pattern and so no other will do. I'm going to try it again but if anyone has any ideas as to why the stars became misaligned (from bottom to top, the stars move to the left) I'd appreciate the help.
ReplyDeleteThis is awesome! Thank you so much. How do I get to share pictures of the ones I made?
ReplyDeleteAlli, I'd really want you to see them.
I used a blue for the body then added cream colored trim on the edges to have contrast and fringe =)
Will be gifting this one to my mom, who just started hooking a few months ago and is doing so great!
ReplyDeleteThank you for the the time you put into this!!
Simply fabulous! Thanks so much! I'd finally gotten fed up with pulling out a handful of hooks whenever I needed to find just one, and other patterns didn't work since my hooks would just poke right through the pockets anyway. Not sure why I never thought of this idea myself, but your star stitch makes the whole thing that much better! I also have some other ideas in mind where I think the star stitch will be lovely. Thank you, thank you, thank you!
ReplyDeleteIn response to another's question about extending this project: I *think* the star stitch as you have presented here is in multiples of 7 + 1 to work out. I chained 92 for my hook caddy since I have lots of hooks. The tutorial just says any odd number will do, which plainly wouldn't work - that's just silly. On the bright side, if you're off by a little, then doing something like putting the final hdc at the end of Row 1 in with the last stitch of the row won't show once it's complete - Ahh, the beauty of crochet: it can hide most mistakes! ;-)
This is an awesome patterns. Thank you. I am having a little problem, mine is curling up. I am not sure what I am doing wrong. Please help.l
ReplyDeleteHi Alli, never mind: I figure out what I was doing wrong. I finished one and came out great. I made this for a gift. Is it okay if I post mine on my FB account? of course I will post your link also. Thank you and have a great day.
ReplyDeleteSure you can! Glad it turned out well. :)
DeleteAlli
Alli. Thank you. I just finished another one. I made it for my bigger hooks.
ReplyDeleteThanks for a beautiful pattern! Usually these cases are kinda boring! Made it longer for my knitting needles ☺
ReplyDeleteHi! This is adorable. I have a question (probably silly) but I can't figure it out.
ReplyDeleteIn the tutorial, you say to go into the center of the star not the last bar of it.
This seems different to me than the link to the star stitch tutorial you linked.
Where in the middle of the star do I place my hook?
Thank you so much.
Made 2 already .. Are the hooks supposed to show on outside of case when you insert on wrong side?
ReplyDeleteCan anyone show me how they have put them in ? And if theirs show on the outside ?
Yes, they show through on the other side!
DeleteThanks for that
DeleteIs the hdc an american version or a british version? :)
ReplyDeletejust found it in your sidebar!! sorry!
DeleteThanks!
ReplyDeleteWill chunky-handled hooks (such as Furls) fit in this? It's difficult/expensive to find commercially-made hook cases that my Furls hooks will fit in, so I'd like to make my own.
ReplyDeleteHi I need help with this tutorial because what do you mean when you say insert into the middle of the star stitch in row 3? Do we chain one then put it in or...?
ReplyDeleteHi! I'm a beginner... How do you pull up a loop? I tried searching YouTube but every video was just advertising patterns and didn't even show how to do it. I think this looks like a really pretty pattern, so hopefully you can help me make it! Thanks 😊
ReplyDeleteA really great pattern. Thank you for sharing.
ReplyDeleteI needed to store more hooks, wanted to store my scissors and cloth tape measure. I made it using 93 chains across and 20 rows high. I also added a 2 star by 3 star (scissor) pocket stitched towards the end of the roll. I chained a few ropes and attached to the inside of the pouch to secure thicker hooks. I had a bit of yarn left from the skein and reverse single crocheted a border around 3 edges and bobbled around the edge visible when its closed.
My favorite project in a while. Thank you again!
Nice pattern but I did something wrong so can please someone help me!
ReplyDeleteIn my 3rd row I have only 61hdcs and 2ch so one is missing, what did I wrong?